Git 101 - Warmup
 Take a moment to create a GitHub account, or verify your password.
Please post your username in Discord (join code over there –> ) so we can get a little social network going.
Follow me @ripleymj.
Roadmap
- 101 Git theory and solo usage
- 201 Git with a friend
- 301 Git with a group / advanced GitHub
What is git?
- Git is a distributed version control system
- Git was started by Linus Torvalds out of frustration with existing systems
- Theories on git’s naming origin vary widely
What is version control?
- A system for tracking changes to files
- A system for tracking the author of changes
- A system for coordinating changes
“Distributed”?
- Everyone has a complete copy of the repository
- Any change can be made to the repository copy
- Changes can be synchronized between copies
- Repository synchronization requires both sides to agree on the exact
series of events in their history
- There are NO exceptions to this rule
- Branch-merge strategy allows private changes that can later be merged into a common history in an orderly manner
What’s the alternative?
- Centralized systems like Subversion are also available
- Repositories are cached locally, but are not authoritative copies
- Committing requires a connection to the central repository
- Much less flexibility, but much less chance of disagreement
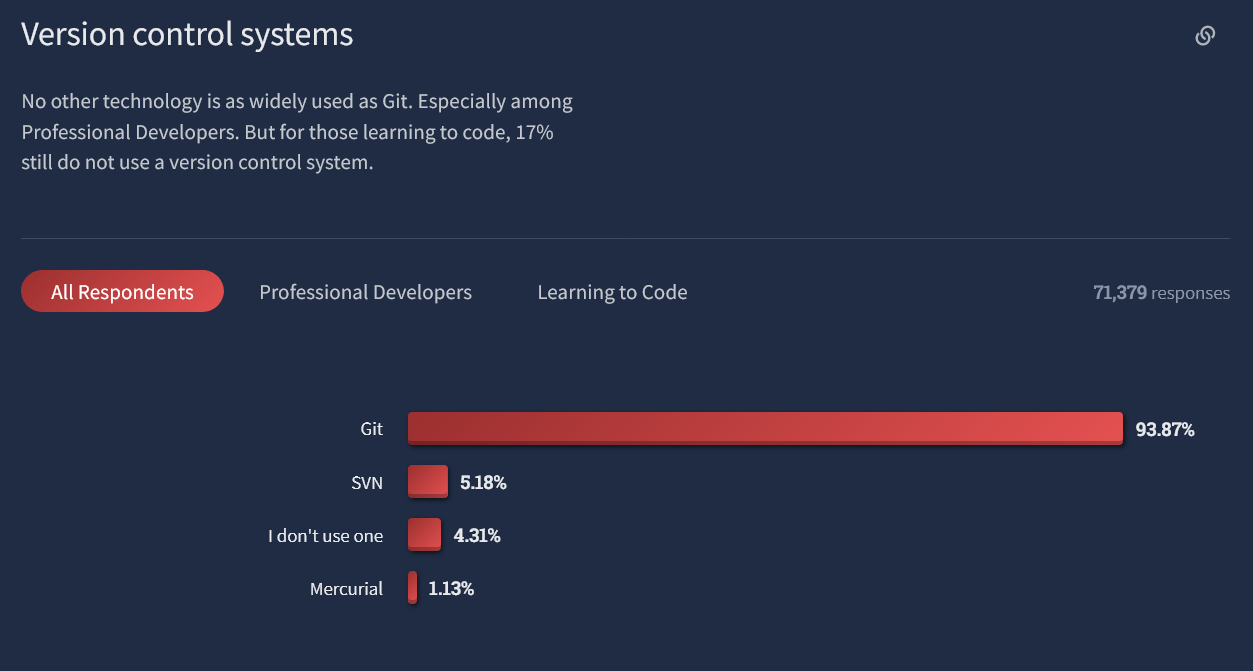
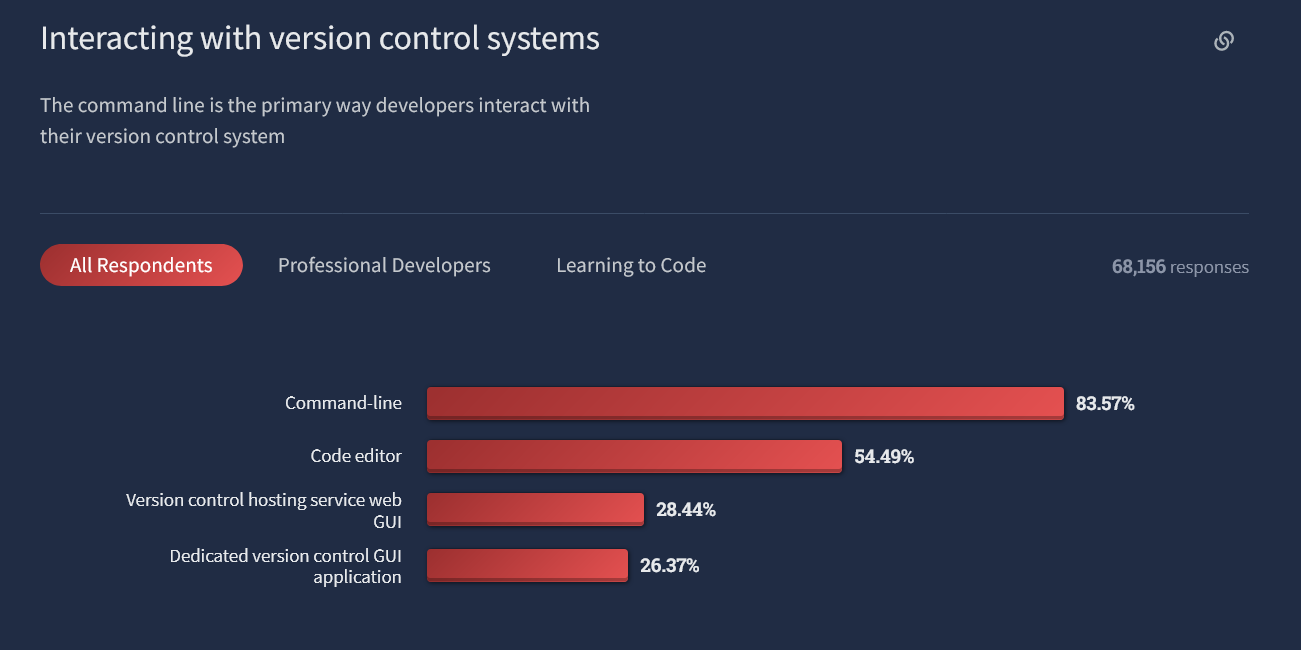
Git ecosystem survey
- StackOverflow conducts an annual survey of developer trends
- Until 2018 they asked about version control preferences
- In 2020, they asked what services you use with git
- Then git was just one of a dozen tools surveyed
- In 2022, the git questions returned
 https://survey.stackoverflow.co/2022/
 https://survey.stackoverflow.co/2022/
 https://survey.stackoverflow.co/2022/
 https://survey.stackoverflow.co/2022/
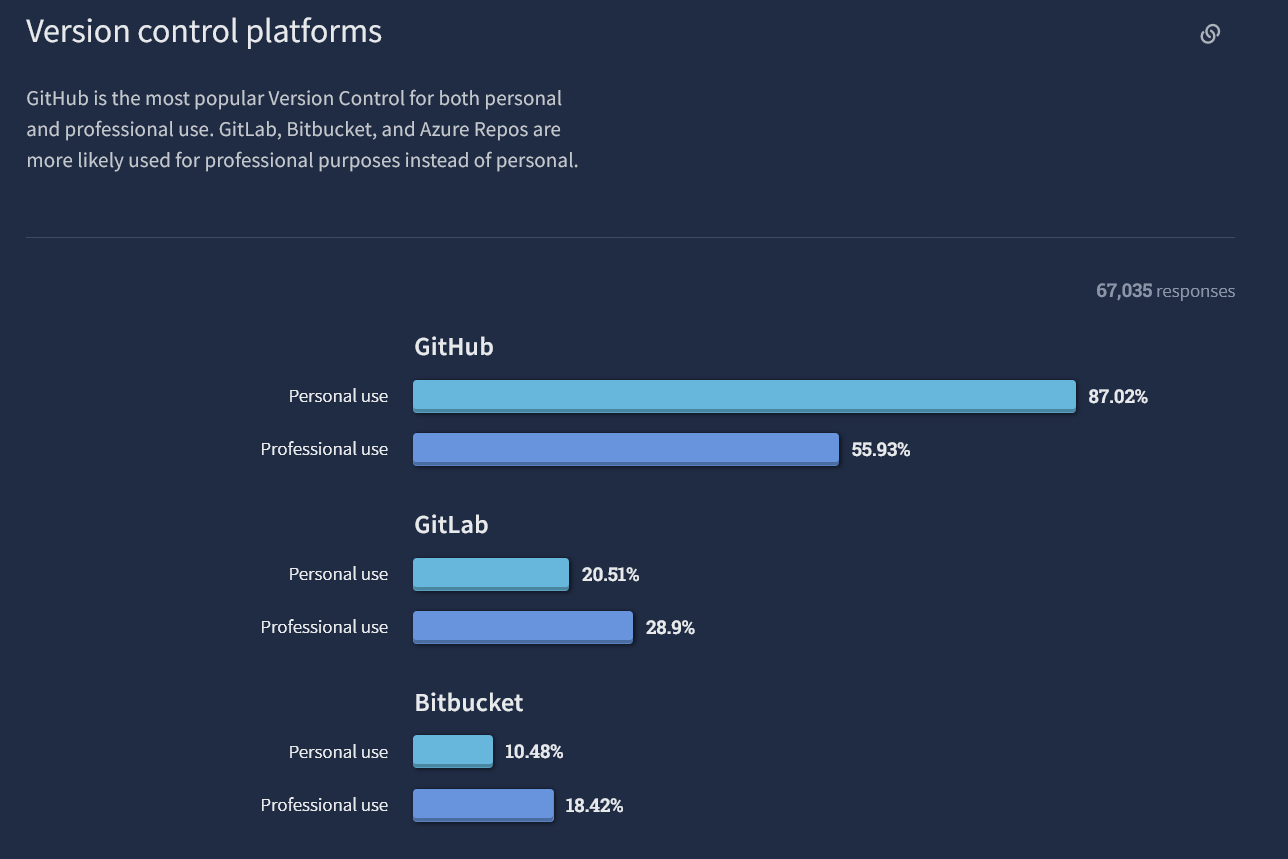
So what about GitHub?
- A social network for git users
- A place to keep a backup repository copy
- A means to exchange changes between people
- A database of issues
- A database of change requests, comments, and approvals
- An API for running events on repository changes
So what about GitHub?
- Remember that git is a tool, and GitHub is a provider of git services
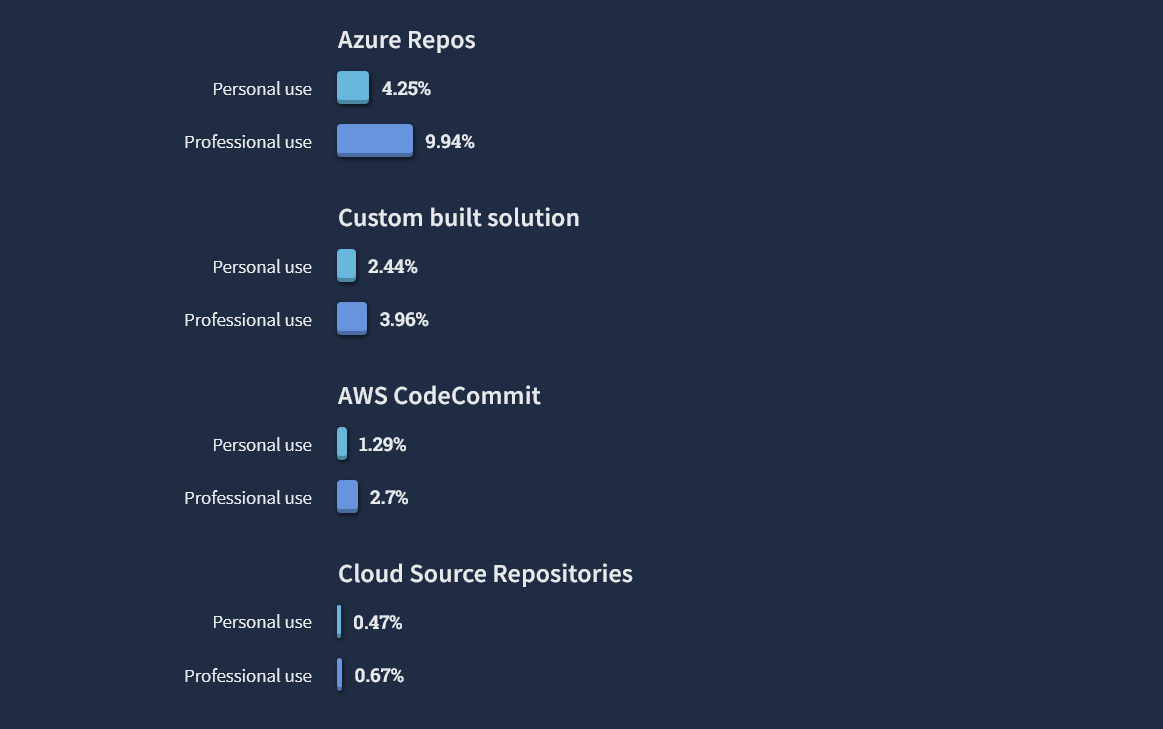
- Other services:
- GitLab
- Bitbucket
- Azure Repos, AWS CodeCommit, Google Cloud Source
- Other git implementations:
- Eclipse EGit
- GitHub Desktop
- Git Bash (ok, so it’s just a port)
- A student pack is available
What is git?
- Git stores a series of changes to files and attributes of that change
- File diff, author, timestamp, previous change hash
- Change and attributes are hashed together to uniquely identify a commit
- Branches allow different authors to pursue different paths
- Like an actual tree, branches can go their own way, but the trunk must be shared
- Never delete a commit: use a revert to undo, but that change is then logged
- Some leeway to rewrite history if your changes haven’t been pushed and become visible to others, or working on a private branch
A note on branching and language
- Git-based projects have a primary branch, traditionally known as
master - You can develop new code on different branches, with the goal of integrating that code back into the primary branch
- Terminology and language matter, and git’s use of the term
masteris considered insensitive and has been deprecated - git and GitHub will both default to
mainnow, but you may find older repos that never renamed
Help along the way
- Git uses man pages extensively to document its options and features
- One man page would be too much for all of git, so pages are hyphenated with
the git-command. For example:
git commitusesgit-commit(1)git pushusesgit-push(1)
- The
git(1)man page exists to document the common options and provide an overview
Demo Time
Understanding GitHub security
GitHub no longer allows plain password use from the command line
- Are you on a computer you frequently use?
- Yes? Use SSH keys
- No? ssh to stu, use SSH keys
- No? Generate a disposable personal token
- Do you already have SSH keys?
ls -l $HOME/.sshand look for id files- Yes? Cool!
- No? Time to generate some
Disposable “Personal Access” Token
- Top-right menu -> Settings
- Developer settings -> Personal Access Token -> Generate Token
- Note optional, probably just seven days, only check
repo - Click
Generate Token, then copy that somewhere to use for the rest of this demo - No, seriously, paste that somewhere right now. You can’t get it back and will have to make a new token
- This is now your password on the command line for the next seven days
git config --global credential.helper storeuse carefully, but this can store your token in a plaintext file
Generating SSH keys
ssh-keygen -t ed25519 -C "your_email@example.com"- Since you don’t already have keys, accept the default file name -
.ssh/id_ed25519 - Password is optional depending how much you trust the computer’s security. You’ll be prompted for this password every time you use the key.
Uploading SSH keys
- Cat your public key, either
.ssh/id_ed25519.pubor.ssh/id_rsa.pub - No, seriously, do not accidentally give away your private key non-.pub file
- Top-right menu -> Settings
- SSH and GPG keys
- New Key, give it a name, and paste your pub file contents
SSH key bonus feature
- ssh keys can be used to expedite Linux logins
- Use
ssh-copy-id username@hostnameto copy your local key to a server - Check
.ssh/authorized_keysto see which keys you’ve already allowed - Valid and possibly preferred to have separate keys for server logins vs GitHub
Basic git configuration
By default, git will have your name and email configured to be your login
name@hostname. This is nice in some ways, but probably not your actual
email address. Let’s fix this. Make sure you substitute all of your own info
in the following commands:
git config --global user.name "Your Name"
git config --global user.email "your@email.address"
git config --global color.ui true
Now git will always know who you are, and this information will be in all
your commits.
Starting your first git repository
First, we will create a directory to use for this tutorial.
mkdir -p ~/UUG/uug-git-intro && cd $_
If we try to use a git command here, we will get an error:
git commit -am "Test commit"
Notice that you got an error when you tried to do this! You cannot create a commit in git without that directory being a part of a git repository.
Starting your first git repository
Let’s initialize your repository.
git init
If you run ls -al, you will now see a .git directory there. This is where
git stores all of the data about your repository. Do not go in here and make
changes without really knowing what you’re doing.
About GitHub URLs
When connecting your local repository to GitHub, there are two types of URLs you can use.
- If using a token, use
https://github.comURLs - If using ssh keys, use
git@github.comURLs
This should make more sense in a few minutes. If you change your mind in the future, you can update URLs with git remote set-url.
Creating a repository on the GitHub website
Using the + button in the top right corner or the webpage, choose “New Repository”. Pick a name and optionally a description. For this tutorial, we will not be using a pre-provided README, .gitignore, or license. Remember the name; you will need this later!
Select the HTTPS or SSH button towards the top of this guide, and notice the section
for push an existing repository. No need to do anything with this now.
Just keep the page open.
Starting your first git repository
You now have to tell git where your code should be pushed to. We are using
GitHub for this. Run the following command, but change YOURUSERNAME to your
git remote add origin https://github.com/YOURUSERNAME/REPONAME.git
Remember later that you have named your GitHub URL origin.
Making your first commit
Commits are basically a record of changes to your directory. Each time you
make a change, you need to tell git to create a new record. You do this
with the commit command.
Before you commit, you have to make a change to the directory. Let’s create a file:
nano README.txt
Making your first commit
Now that we have created a file, we can ask git to tell us the status of
of our directory.
git status
Normally git can tell exactly what’s different in the file.
git diff
But that only works against the last commit, so it will not show our README.
Making your first commit
We should instruct git to start tracking changes to our README.txt file. We
also need to add it to our ‘stage’. To do this, we will use the following command.
git add README.txt
Let’s tell git to create a record of our change
git commit
Vim (or your default editor) will open. Type a description of your changes,
called a commit message, and save the file (in Vim, you can type :wq in
normal mode).
See a record of commits
git keeps a record of each of your changes in a log. To see this:
git log
Changing branch name
git log should show that git has automatically chosen the name master for your
primary branch. Let’s change that now.
git branch -M main
Synchronizing GitHub
The first time you push to an upstream copy, you can use the -u option to tell
git your preferred default.
git push -u origin main
This will tell git to push your current branch main (since you just renamed it)
to the main branch at the origin URL, and to remember that for future use. Now
that you’ve set the default, you can simply use:
git push
Go check GitHub now to confirm your changes were uploaded.
Reverting a commit
As you’re making changes, you very often will want to undo one of your previous
commits. git allows for this with its revert command.
Let’s modify our directory and commit that change.
git rm README.txt
git commit
Later, we realize that we regret this change. We can undo this. The way that
reverting works in git is by taking the state of the repository at a point in
time and bringing it back to the present.
So what we need to do is check our log, and find the hash of the commit we want to revert. Use the following command (replacing the hash):
git log
git revert "hash"
This will create a commit with the default message, ‘Revert “Old Commit”’. Push this change back to GitHub:
git push
gitignore
- While git can contain binary files (like the images in this presentation),
tradition says it should not contain binaries that are artifacts of source files
- Commit your C or Java files, not executables,
.o, or.classfiles
- Commit your C or Java files, not executables,
- A
.gitignorefile will tell git about file extensions or folders you don’t want - You always choose which files to commit, but
.gitignorewill prevent accidentally committing files you don’t want
Hacktoberfest
Stay tuned for Hacktoberfest where you can win prizes for contributing to projects on GitHub during the month of October
Going futher
For a git reference, check out GitHub’s
Git cheat sheet or
Git cheat sheet for education